
LIGHT, SHADOW, HI-LIGHT Episode 2
- Barry Mountford
- Feb 15, 2020
- 3 min read

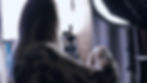
Hey guys in episode 2 from my Light, Shadow, and Hi-light series I will take you behind the scenes from this image, I will break down the lighting setup one by one, I will go through the camera gear used so you can easily recreate this look in your own style, think of it as a great starting point. If you would like to watch the video covering all of this click below.
If you haven't seen Episode one follow this link.
In this episode we decided to change up the background to a grey hand painted canvas
and Ashleigh swapped out her outfit to blue denim to keeping the muted tones running through the image. This time I started with my main light which was a Pika 200 in a 90cm ocotobox with a grid fitted positioned at a 45 degree from camera and subject which is a great position to create that nice Rembrandt
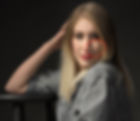
look, you can see the triangle pattern under the eye on the shadow side of our models face, the grid is essential for me when working in such a small studio space, as it helps control the spill of light and allows me to focus my light on the model. My meter reading for the main light is F8 with a shutter speed of 1/200 second and the ISO is set to 100 and because my model and the light position won't be moved I won't need to change these setting throughout this set. Next I set the hair light / kicker light which is placed high up behind our model, I am using a standard reflector fitted with a 60 degree grid
and lit with a speedlite which with all the lights remotely controlled from my camera trigger it is quick and easy to adjust the power output of that light with it being placed high up. When it comes to the hair light it comes down to your taste on the strength of the light, do you choose a strong hair light or go for a more subtle one? no right or wrong answer here folks its all in the eye of the creator, I tried both and they both look great but I settled on a more subtle hair light which still gives a nice separation from the background.
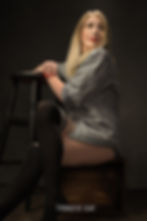

Now I want to control the shadow value, how light or dark I want it, think of this light as your lightroom shadow slider, now working in my small space its difficult to have more than one light setup at a time so where you could easily setup another octobox behind the camera and use that as a fill light or you could go with a smaller light source depending on how much contrast you want in the image, I don't have that luxury of space my studio soI have made a ceiling lighting rig link here which allows me to mount my lights, up high. So for the fill light I am using a citi 600 fitted with a standard reflector mounted to the ceiling rig which is firing against my white painted wall
which is bouncing the light back into our model and lifting the shadows,
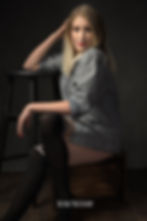
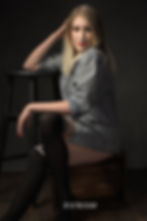
I like this set up a lot as it gives you full control of all the aspects of the lighting and allows you to easily switch things up. This really is one of the easier lighting setups which creates great results and one I recommend you try out!
My choice of camera was the Nikon Z6 and I was using the kit lens 24-70mm f4 which is a fantastic lens and I can not stress enough don't under estimate your kit lens especially when your shooting in studio conditions, as good lighting yields great results with any lens, I have all my prime portraits lenses but this has become a favourite of late.
Don't worry if you don't have the same lights as I am using, you can recreate this look with what ever lights you choose to use but if you would like to checkout all the gear used, links will be below. Thanks guys and I hope you have fun trying this out! until next time.
Affiliate links below,
Camera. https://amzn.to/2v53b2B
Kit Lens. https://amzn.to/2RFIdzc
Favourite prime lens https://amzn.to/36bKR4X 5 in 1 reflector. https://amzn.to/34n7Ny4 Speedlite. https://amzn.to/2KQQQnH
Pika 200. https://amzn.to/2KMJTE3
Smart Bracket https://amzn.to/2Daq2uj
Light Stand. https://amzn.to/2sdDZpj
c stand. https://amzn.to/33i0C8I
90 cm octobox. https://amzn.to/2pRgwti
Rode Video Micro https://amzn.to/2XMpbJR
Rode Cable https://amzn.to/2pLcuT1
clamps. https://amzn.to/37CH82i
Table top tripod https://amzn.to/33ejw0j
All Terrain Trolly https://amzn.to/2QNiKEQ
Motorised Dolly. https://amzn.to/2OdMvgt
Gimbal. https://amzn.to/35zJptb
Card Reader https://amzn.to/2QPb3y6
HDD Dock https://amzn.to/2QKHxtd
Belt Camera strap https://amzn.to/2rpgF7K
Sandbag https://amzn.to/2pRhYfe
Huion 610 Pro Graphics Tablet https://amzn.to/37CIr1c